BLOCK BREAKDOWN

Thursday, July 31, 2014

WICKED Challenge

I wasn't planning to post this until Saturday, but with all the pictures Cherrywood has been posting I'm overly excited -- the Wicked Challenges look AMAZING!!!  So far there are like 100 entries - wow!  The deadline is tomorrow, so I bet that number will go up with a bunch of overnight express deliveries.  Go check out their facebook page, seriously!  This was way too much fun!

I started this post way back in June when I finished my challenge.  I did tweak it in July, but only for the better, those typos really stink (I make a lot of them, the brain works way faster than the fingers type). You probably don't realize how hard it has been for me to not share -- it was extremely difficult, I am an over-sharer!

So, you'll remember here and here when I was working on my Wicked Cherrywood Challenge - there were a couple of other posts as well, but no need to share them all (the others were just quick updates).  You'll see on the left are the rules and regulations for the challenge - fun!  Oh, and if you still haven't checked out Cherrywood Fabrics, you really should -- the fabrics are amazing. Super soft, fantastic colors, and they quilt like butter. And not like a cold, frozen stick of butter, like one that's been sitting on the counter softening for hours... super smooth!

This post will be full of pictures -- I like sharing pictures, must be the visual aspect, the eye candy, so much better than all these words, although this post is full of both.  Haha, who am I kidding, I like sharing period.  Yes, definitely an over-sharer.  We'll start here -- the challenge fabrics.  Aren't they just lovely?  I knew immediately I wanted to do this challenge -- maybe because I love green, or maybe because the subject matter was perfect, but either way the fabrics are amazing!

Just look at this one -- this green is by far my favorite! I wish the camera could capture the beauty of the fabric -- it's close, but you really have to see it in person to truly appreciate it. And the hand... OMG!  Yep, I have fallen head over heels for Cherrywood fabrics.

As I mentioned in my previous posts, unfortunately, I have not seen Wicked the Musical.  But I sure want to see it now! I have read reviews of the musical, read blog posts, read reviews of the book (which I'll end up reading soon), viewed photographs, talked to people -- pretty much over researched it!  And what I decided was I wanted an amazing Elphaba -- like big hair wild-wicked style.  So I started drawing and doodling, and erasing, and drawing some more.  I also knew that I wanted to incorporate the Clock of the Time Dragon, which as we know isn't even a clock!  And of course, flying monkeys...

So after all that research, here's what I came up with:

Now to turn my drawing into a quilt!  I took all the greens and cut them in various widths, and sewed them together in random fashion:


In my original drawing I have the bottom right corner stripes going diagonal.  In real life I didn't like it so much, so I made half vertical and the other half horizontal.  I then started on the pieces -- Elphaba's face was done using turned edge applique foundation.

Let me tell you... that clock was a difficult little bugger!  Lots of little tiny pieces to snip away.  I decided to use raw-edge fusible applique here -- much easier than trying to turn all those tiny edges. My impatience usually beats out my OCD...

And then on to building her hair.  Each curl was numbered and done turned edge applique foundation:

After I was finished, I realized it still needed a few more curls.  Planning doesn't always cover everything!

And then some bubbles... just because I thought they looked cool!  As well as the fact that Elphaba states she doesn't come and go by bubble...

These are also turned edge applique foundation:

And then came time to attach all those applique pieces.  I used a high-loft batting as my stabilizer.  This way, I would trim away the excess and have done some trapunto prep in the process.  I love using that two birds one stone method!

Now, don't forget about those flying monkeys.  I wanted to incorporate them into the quilting.  So I drew three of them on the background.

And here she is, loaded on the Gammill and ready to be quilted!


First, outlining all the applique pieces -- very important!

And here's where it all went bad.  Not really, as hindsight is 20/20, but it was at this point that the self-doubt, hate, dislike, disgust, etc. kicked in...

I outlined the monkeys and wording (oh forgot to tell you about that) with a very dense stipple (like I always do), and I just didn't like it.  The thread is showing as gold, but it is actually an avocado green which blends well with all three greens.  But all that didn't matter.  I was at that dreaded hate part of the project.


Yep, I pretty much hated my project.  No worries... this happens to me on every project that I make. Well, not every one, but the ones that truly turn out amazing always seem to have this self-doubt phase. I'm learning it is an important step in finishing - at least for me.

Here is the completed quilting -

Nope, still not happy, but it is finished.  So now I soak it in some warm water to soften all my foundations.  I then block it and hope I like it more in the morning.

Well, sleep does amazing things for me.  I had an epiphany while I was snoozing.  Why not outline the monkeys and the wording in black?  It would pop more and that might just solve my issues of dislike...


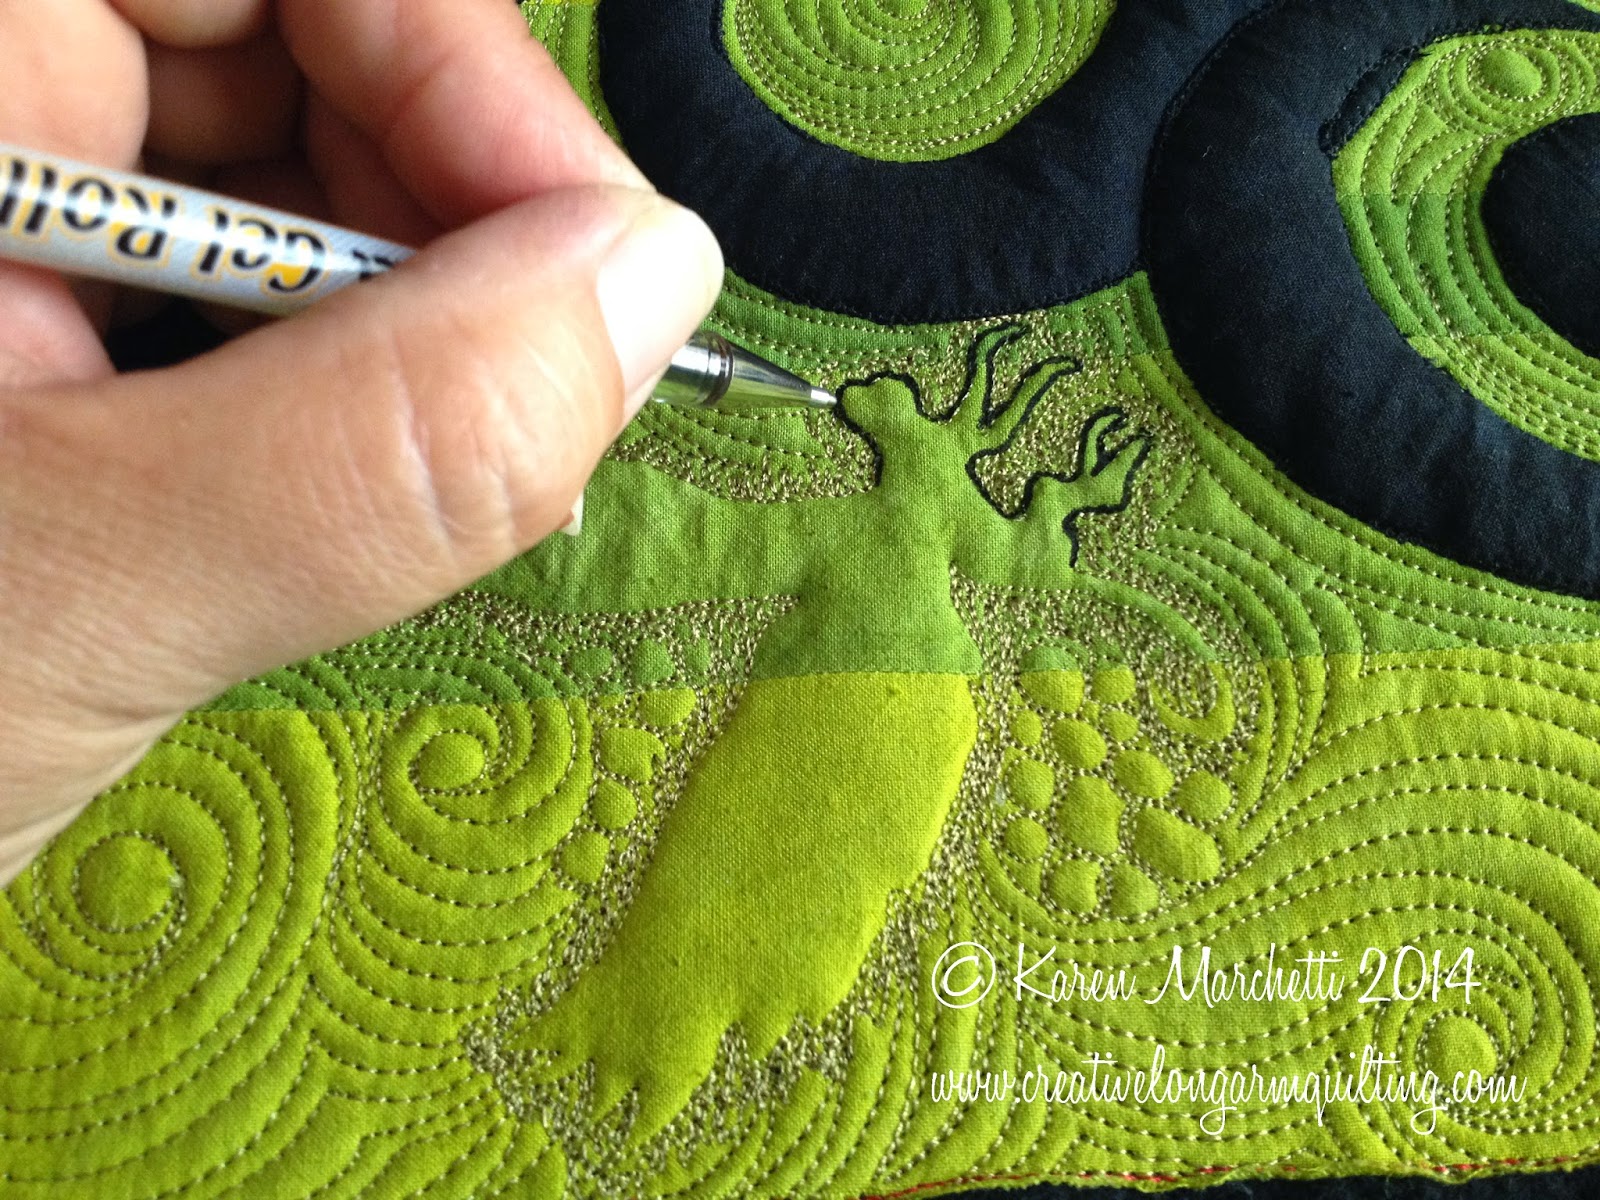
Yep!  That was exactly what it needed -- see, sleep is good, happiness has returned!

Now to trim this beauty down.  The challenge requirement is 20"x20" - oh no, that poor flying monkey is going to lose part of his wing!  Oh well, guess it just has to be.  I wouldn't want to be disqualified over that little wing tip!

And then comes the binding... yes, by hand!

Oh look - scraps!  Why not make a matching sleeve?

And you all know me and my labels -- this is a simple one, but still fun!

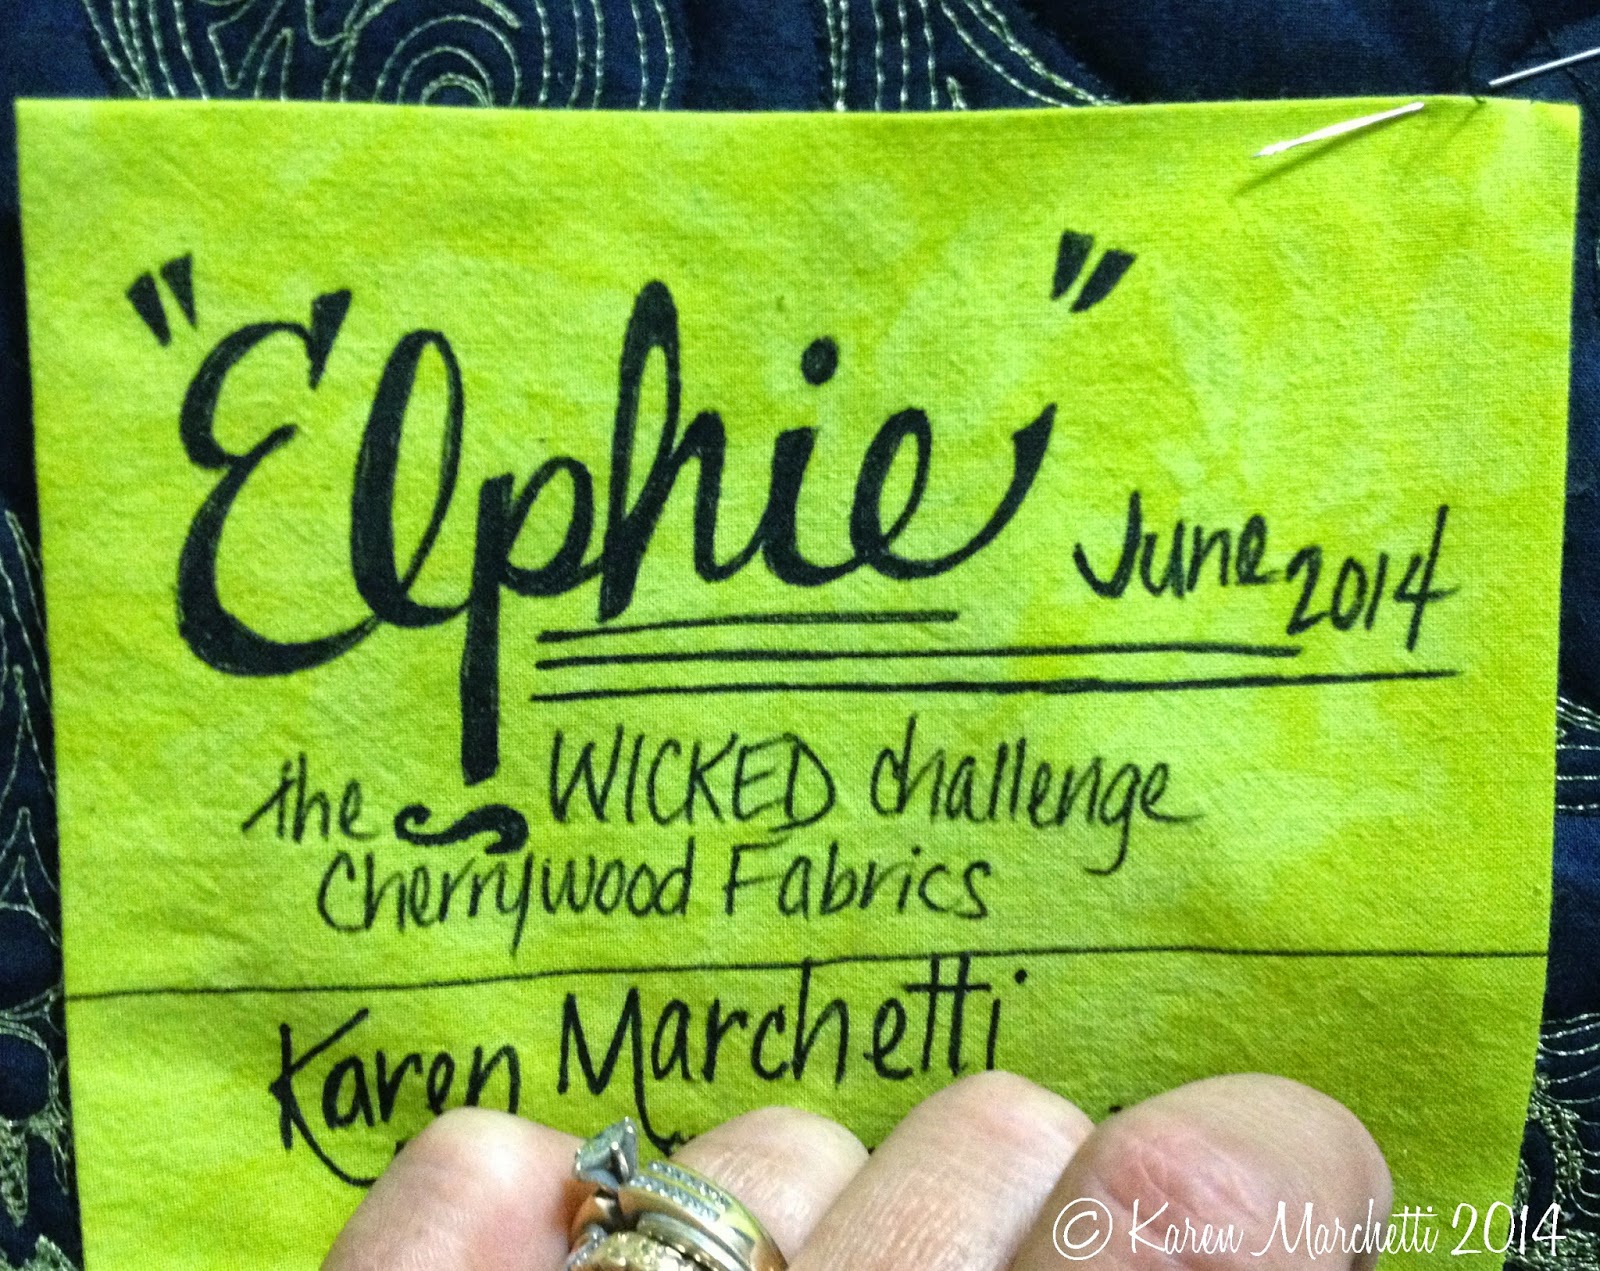
Here she is -- Elphie!  I am so thrilled with this.  I know I hated it for one awful evening, but now I truly LOVE it.  And a big thanks to my quilty genius for all the texting and reassuring that I was indeed crazy.

And the back, you know, because the back view is always my favorite -- it shows just the stitches -- awesomeness!

I can not wait to see all the entries -- they are going to be amazing. The exhibit will be displayed at the Gershwin Theater (home of WICKED) on Broadway in NYC through November 3, 2014.  This is all part of the big 11th Anniversary Celebration of Wicked - so if you're there, go check it out!!  Take pics, share and tag on Facebook... you know what to do!

As if all that wasn't enough, the top 24 will travel around with Cherrywood for an entire year -- more awesomeness!  So watch for all the entries on the Cherrywood website -- I can't wait!

Wednesday, July 30, 2014

Loops Wins and a delivery surprise!

Last night, Andrea from AQS left me the most wonderful voicemail.  Outta the Loop had won 1st Place Wall Computer-Aided at AQS Charlotte.  WOW!  Yes, WOW!  I know, I don't use a computer, but I do use a stitch regulator and this year the rules were changed to include stitch regulation as computer-aided (I think they are working on this).  I was tickled pick.  The hardest part was keeping quiet until this morning.  I did share it with a few special peeps, including Eyvonne (since half of the quilt is hers).  She was floating on happy awesomeness as well.  Here is the AQS link to all the winners - congratulations everyone!

In case you've never seen Outta the Loop - here are a few pictures:

For those that don't know about this quilt, Eyvonne pieced this beauty and I quilted it.  You can read about the history of Loop here and here.  This quilt holds a very deep place in my heart, as you can see by my label (and read in the previous posts):

The labels are really cool -- mine is a tracing of my left hand (I'm a lefty) and Eyvonne's a tracing of her right hand (yep, she's a righty).   Loop is truly one of my favorite quilts, it has a little piece of me stitched in there, with more than a few tears.

So as if all that wasn't enough awesomeness for today.  Fedex returned my quilts from Quilt Odyssey. I opened the box to put them away and OMG, there's a ribbon.  Really?  Because I didn't even know I had won a ribbon. The Thing with Feathers won an Honorable Mention!  

I must say, with all the trials I've had over the past week with True Colors (aka White Lines), it's really nice to have a bunch of awesomeness thrown in!

Sunday, July 27, 2014

Update on White Lines...

I know you've all been waiting on bated breath to hear about the progress on True Colors.  If you don't know what I'm talking about, scroll down to the last two posts, or click here and here.

The news is not good...
Unfortunately, the solution provided by Blue Line Eraser did not work.  I used the White Line Eraser, filled the pen, and scrubbed in every direction.  This was the corner I treated after it had dried:

As you can see, the white lines are still there.  I was disgusted... crying... upset... all of it.  So my loving family and I went out to dinner in an attempt to not think about this quilt, even if only for an hour and a half.  Here's a peek at the wonderful dinner:

It was nice, nice to not be fretting about the quilt.  Well, that lasted for a little while.  Of course, sleep was elusive so I tossed and turned and thought about the quilt.  Joe tells me I'm nuts, that I should just send it out to the exhibit and then let it sit as a reminder (aka learning experience).  That I should just stop, give no more worry to this quilt and be done.  I can't... it is like a little piece of me and I know that somehow it can be fixed and shown.

Well, this morning rolled around.  Blue Line had already messaged me to see how the solution worked.  I responded and explained that at this point my only solution is to try painting over the lines with a black Shiva Paintstik.  That was the only thought that worked in my entire night of tossing and turning.  Why did the lines come out in Blue Line's test sample and not on my quilt?  That I don't know, perhaps because my markings had been on the quilt for almost a month?  We will probably never know.  I do know that I'll probably never use this pen again.  Please don't think this is Blue Line's fault -- the are not the manufacturer of the pen.  And they did come up with a solution that worked on their test samples.  We are still waiting to hear back from the pen manufacturer.  Again, it is a freak thing -- the lines went away when soaked, but they were still there you just couldn't see them -- unless you are using a flash -- crazy, strange, just an unknown!  So until there is a solution that just spritzes it away (even with the flash) it's not something I'll be using.

So, this morning I grabbed my trusty black Shiva paintstik and a brush and started painting.  Here is that same corner after using the Shiva paintstik -- not perfect, better.

So I continued, here's another view - the left is not painted, the right area is:

And again, I tried the paint in another area -- left unpainted, right side paint started:

It looks like I have a lot of painting in the next few days.  As well as snapping a million flash pictures to see where I have missed and need to repaint.  All while hoping and praying that it is not going through to the back.  If that happens I'll be done... at least with this quilt.  Oh, and I still have to bind this quilt. Looks like I'll be falling more behind on my client schedule - thank goodness for overnight deliveries, that should give me a few extra days to get this finished.  I'll still share the finished pictures when I'm actually finished... I guess I wasn't kidding when I called this the quilt that refused to be finished!

Thursday, July 24, 2014

White lines...

It all started last night.  See my previous post (or just scroll down).  I finally finished True Colors and did the soak to remove the slightly stubborn white water soluble pen markings.  Then I blocked the quilt and we left off with something that looked like this:

The quilt was looking amazing.  I was even over my self-doubt phase that kicked in earlier while I was quilting.  I was happy with it, it still had a few issues, but overall I was happy.

So I took a bunch of pictures, here's just a couple:


You'll notice a couple of things -- one being that the quilt is two different black batik fabrics.  Yes, two different dye lots one has much more blue than the other, these things happen when you wait soooooo long to finish projects.  I tried to balance the two in the most aesthetically pleasing way possible.  You'll also notice that all of the marking lines have been removed.

Well, guess what.  Things are not always as they seem...

Late last night I grabbed my cell phone to snap a quick picture to text.  The cell phone is always set to auto for the flash mode.  Here's what I saw when I went to text the picture:

OMG what is that?!!  Why are all the marking lines there.  Now this was a new marking pen (white water soluble pen available from Blue Line Eraser) that I used, but I tested it on this fabric (both blacks).  It was stubborn, but it went away.  You can't imagine what was going through my mind.  I sat there looking at the quilt with no markings on it and looking at this picture with white lines all over it!  Confusion, massive headache, palpitations, you name it, I was feeling it.  Nothing could explain what was going on, so I took some more pictures with the phone - with and without the flash:


Pure craziness, right?  I tried everything to make these lines disappear.  Most of the night I spent fretting about this.  Trying to figure out why.  The lines aren't visible to the eye, but they are everywhere when using a flash.  The worst part is many people use the flash on their cameras while at quilt shows -- pssst.... you get much better pictures with no flash - spread the word!  But could you imagine if this quilt were hanging at a show and someone snapped photos of it using their flash -- look at what they would see!  OMG, it's like the working copy, not the finished product.  I was so upset, I was retiring this quilt before it even had the chance to be shown.  I was sending it off to the special exhibit at Quilt! Knit! Stitch! (as it is already committed) and then it was going to be done.

So after a stressful night, this morning I messaged Blue Line Eraser.  And yes, I already tried the fantastic blue stuff on this - it didn't work.  I even scrubbed some areas with a Magic Eraser sponge (bad I know), didn't work.  I was ready to soak it again in some baking soda and water when Sky from Blue Line messaged me back.  Sky asked that I wait to do anything more.  Using the same products as me, Blue Line then spent the day working on formulas and tweaking and creating and doing the Blue Line things they do and came up with a solution!  They are express mailing it to me and I will have it in time to spend the weekend fixing the quilt!  I'm keeping everything I have crossed that it works on my quilt (it worked on Blue Lines test samples).  I am so thankful for how helpful they were!

Reflecting on this I'm so glad I snapped the picture with the phone or I wouldn't have known any of this. I'm also glad that Blue Line has come up with a solution, staying extremely optimistic!  I'll keep you all informed and will share the results sometime next week.  I've got to rid the quilt of the white lines and still need to get the binding on this beauty and have her shipped out by the end of next week!

Like always, sharing the good and the bad -- thanks for following!

Wednesday, July 23, 2014

Soaked and Blocked

True Colors finally came off the frame tonight.  I was starting to think it was going to stay up there forever, no really.  It has been like weeks, much too long.

So, during my Facebook postings many people asked me what my soaking process was.  Well, I have two -- the super quick, throw the quilt in the bathtub and run water on it until its wet, roll it up in a towel and then start the blocking process.  And then there is the other way -- when I have lots of foundation applique that needs to soften or in this case that as well as removing the white markings.  If you don't remember the markings, look at this post.  As this was the first time I was using this water soluble marking pen, I did a test sample on the same fabric as the quilt.  It didn't just wash away when spritzed with water, I really need to soak the piece before the markings disappeared.  So, in this case, I put the quilt in the washing machine and let it fill with very hot water.  Then, I let it sit, swished it every so often, and let it sit again.  I do this for probably 20 minutes or so.

Then I drain the water and let it spin just enough so that it is not dripping as I carry it over to the blocking foam.  Easy enough, right?

Then I start the blocking, pulling and pinning, and working the quilt flat.  It usually takes about three times around the quilt and some sore fingertips for me to achieve perfect results.  But blocking is magical -- it totally makes your quilt flat!

So then we have this:

And there it sits, under the fan until it is dry.  I usually leave it blocked for at least two days.  We'll see, I really, really, really need to get the binding on this!

More pics soon, you know the real ones with perfect lighting, etc.  Oh, and if you want to see this beauty up close, it'll be in a special exhibit at IQA's new show, Quilt! Knit! Stitch! in Portland, OR this August (next month)!